The slide provide a high-level summary of the accessibility features that we’ve developed in the W3C for HTML5, including:
Subtitles & Captions with WebVTT and the track element
Video Descriptions with WebVTT, the track element and speech synthesis
Chapters with WebVTT for semantic navigation
Audio Descriptions through synchronising an audio track with a video
Sign Language video synchronized with a main video
I received some excellent questions.
The obvious one was about why WebVTT and not TTML. While for anyone who has tried to implement TTML support, the advantages of WebVTT should be clear, for some the decision of the browsers to go with WebVTT still seems to be bothersome. The advantages of CSS over XSL-FO in a browser-context are obvious, but not as much outside browsers. So, the simplicity of WebVTT and the clear integration with HTML have to speak for themselves. Conversion between TTML and WebVTT was a feature that was being asked for.
I received a question about how to support ducking (reduce the volume of the main audio track) when using video descriptions. My reply was to either use video descriptions with WebVTT and do ducking during the times that a cue is active, or when using audio descriptions (i.e. actual audio tracks) to add an additional WebVTT file of kind=metadata to mark the intervals in which to do ducking. In both cases some JavaScript will be necessary.
I received another question about how to do clean audio, which I had almost forgotten was a requirement from our earlier media accessibility document. “Clean audio” consists of isolating the audio channel containing the spoken dialog and important non-speech information that can then be amplified or otherwise modified, while other channels containing music or ambient sounds are attenuated. I suggested using the mediagroup attribute to provide a main video element (without an audio track) and then the other channels as parallel audio tracks that can be turned on and off and attenuated individually. There is some JavaScript coding involved on top of the APIs that we have defined in HTML, but it can be implemented in browsers that support the mediagroup attribute.
Another question was about the possibilities to extend the list of @kind attribute values. I explained that right now we have a proposal for a new text track kind=”forced” so as to provide forced subtitles for sections of video with foreign language. These would be on when no other subtitle or caption tracks are activated. I also explained that if there is a need for application-specific text tracks, the kind=”metadata” would be the correct choice.
I received some further questions, in particular about how to apply styling to captions (e.g. color changes to text) and about how closely the browser are able to keep synchronization across multiple media elements. The earlier was easily answered with the ::cue pseudo-element, but the latter is a quality of implementation feature, so I had to defer to individual browsers.
Overall it was a good exercise to summarize the current state of HTML5 video accessibility and I was excited to show off support in Chrome for all the features that we designed into the standard.
I finished up at Google last week and am now working at NICTA, an Australian ICT research institute.
My work with Google was exciting and I learned a lot. I like to think that Google also got a lot out of me – I coded and contributed to some YouTube caption features, I worked on Chrome captions and video controls, and above all I worked on video accessibility for HTML at the W3C.
I was one of the key authors of the W3C Media Accessibility Requirements document that we created in the Media Accessibility Task Force of the W3C HTML WG. I then went on to help make video accessibility a reality. We created WebVTT and the <track> element and applied it to captions, subtitles, chapters (navigation), video descriptions, and metadata. To satisfy the need for synchronisation of video with other media resources such as sign language video or audio descriptions, we got the MediaController object and the @mediagroup attribute.
I must say it was a most rewarding time. I learned a lot about being productive at Google, collaborate successfully over the distance, about how the WebKit community works, and about the new way of writing W3C standard (which is more like pseudo-code). As one consequence, I am now a co-editor of the W3C HTML spec and it seems I am also about to become the editor of the WebVTT spec.
At NICTA my new focus of work is WebRTC. There is both a bit of research and a whole bunch of application development involved. I may even get to do some WebKit development, if we identify any issues with the current implementation. I started a week ago and am already amazed by the amount of work going on in the WebRTC space and the amazing number of open source projects playing around with it. Video conferencing is a new challenge and I look forward to it.
I decided to use socket.io for the signalling following the idea of Luc, which made the server code even smaller and reduced it to a mere reflector:
 var app = require('http').createServer().listen(1337);
 var io = require('socket.io').listen(app);

 io.sockets.on('connection', function(socket) {
         socket.on('message', function(message) {
         socket.broadcast.emit('message', message);
     });
 });
Then I turned to the client code. I was surprised to see the massive changes that PeerConnection has gone through. Check out my slide deck to see the different components that are now necessary to create a PeerConnection.
I was particularly surprised to see the SDP object now fully exposed to JavaScript and thus the ability to manipulate it directly rather than through some API. This allows Web developers to manipulate the type of session that they are asking the browsers to set up. I can imaging e.g. if they have support for a video codec in JavaScript that the browser does not provide built-in, they can add that codec to the set of choices to be offered to the peer. While it is flexible, I am concerned if this might create more problems than it solves. I guess we’ll have to wait and see.
I was also surprised by the need to use ICE, even though in my experiment I got away with an empty list of ICE servers – the ICE messages just got exchanged through the socket.io server. I am not sure whether this is a bug, but I was very happy about it because it meant I could run the whole demo on a completely separate network from the Internet.
The most exciting news since my talk is that Mozilla and Google have managed to get a PeerConnection working between Firefox and Chrome – this is the first cross-browser video conference call without a plugin! The code differences are minor.
Since the specification of the WebRTC API and of the MediaStream API are now official Working Drafts at the W3C, I expect other browsers will follow. I am also looking forward to the possibilities of:
multi-peer video conferencing like the efforts around webrtc.io,
The best places to learn about the latest possibilities of WebRTC are webrtc.org and the W3C WebRTC WG. code.google.com has open source code that continues to be updated to the latest released and interoperable features in browsers.
The video of my talk is in the process of being published. There is a MP4 version on the Linux Australia mirror server, but I expect it will be published properly soon. I will update the blog post when that happens.
The W3C HTML WG and the WHATWG are currently discussing the introduction of a <main> element into HTML.
The <main> element has been proposed by Steve Faulkner and is specified in a draft extension spec which is about to be accepted as a FPWD (first public working draft) by the W3C HTML WG. This implies that the W3C HTML WG will be looking for implementations and for feedback by implementers on this spec.
I am supportive of the introduction of a <main> element into HTML. However, I believe that the current spec and use case list don’t make a good enough case for its introduction. Here are my thoughts.
Main use case: accessibility
In my opinion, the main use case for the introduction of <main> is accessibility.
Like any other users, when blind users want to perceive a Web page/application, they need to have a quick means of grasping the content of a page. Since they cannot visually scan the layout and thus determine where the main content is, they use accessibility technology (AT) to find what is known as “landmarks”.
“Landmarks” tell the user what semantic content is on a page: a header (such as a banner), a search box, a navigation menu, some asides (also called complementary content), a footer, …. and the most important part: the main content of the page. It is this main content that a blind user most often wants to skip to directly.
In the days of HTML4, a hidden “skip to content” link at the beginning of the Web page was used as a means to help blind users access the main content.
In the days of ARIA, the aria @role=main enables authors to avoid a hidden link and instead mark the element where the main content begins to allow direct access to the main content. This attribute is supported by AT – in particular screen readers – by making it part of the landmarks that AT can directly skip to.
Both the hidden link and the ARIA @role=main approaches are, however, band aids: they are being used by those of us that make “finished” Web pages accessible by adding specific extra markup.
A world where ARIA is not necessary and where accessibility developers would be out of a job because the normal markup that everyone writes already creates accessible Web sites/applications would be much preferable over the current world of band-aids.
Therefore, to me, the primary use case for a <main> element is to achieve exactly this better world and not require specialized markup to tell a user (or a tool) where the main content on a page starts.
An immediate effect would be that pages that have a <main> element will expose a “main” landmark to blind and vision-impaired users that will enable them to directly access that main content on the page without having to wade through other text on the page. Without a <main> element, this functionality can currently only be provided using heuristics to skip other semantic and structural elements and is for this reason not typically implemented in AT.
Other use cases
The <main> element is a semantic element not unlike other new semantic elements such as <header>, <footer>, <aside>, <article>, <nav>, or <section>. Thus, it can also serve other uses where the main content on a Web page/Web application needs to be identified.
Data mining
For data mining of Web content, the identification of the main content is one of the key challenges. Many scholarly articles have been published on this topic. This stackoverflow article references and suggests a multitude of approaches, but the accepted answer says “there’s no way to do this that’s guaranteed to work”. This is because Web pages are inherently complex and many <div>, <p>, <iframe> and other elements are used to provide markup for styling, notifications, ads, analytics and other use cases that are necessary to make a Web page complete, but don’t contribute to what a user consumes as semantically rich content. A <main> element will allow authors to pro-actively direct data mining tools to the main content.
Search engines
One particularly important “data mining” tool are search engines. They, too, have a hard time to identify which sections of a Web page are more important than others and employ many heuristics to do so, see e.g. this ACM article. Yet, they still disappoint with poor results pointing to findings of keywords in little relevant sections of a page rather than ranking Web pages higher where the keywords turn up in the main content area. A <main> element would be able to help search engines give text in main content areas a higher weight and prefer them over other areas of the Web page. It would be able to rank different Web pages depending on where on the page the search words are found. The <main> element will be an additional hint that search engines will digest.
Visual focus
On small devices, the display of Web pages designed for Desktop often causes confusion as to where the main content can be found and read, in particular when the text ends up being too small to be readable. It would be nice if browsers on small devices had a functionality (maybe a default setting) where Web pages would start being displayed as zoomed in on the main content. This could alleviate some of the headaches of responsive Web design, where the recommendation is to show high priority content as the first content. Right now this problem is addressed through stylesheets that re-layout the page differently depending on device, but again this is a band-aid solution. Explicit semantic markup of the main content can solve this problem more elegantly.
Styling
Finally, naturally, <main> would also be used to style the main content differently from others. You can e.g. replace a semantically meaningless <div id=”main”> with a semantically meaningful <main> where their position is identical. My analysis below shows, that this is not always the case, since oftentimes <div id=”main”> is used to group everything together that is not the header – in particular where there are multiple columns. Thus, the ease of styling a <main> element is only a positive side effect and not actually a real use case. It does make it easier, however, to adapt the style of the main content e.g. with media queries.
Proposed alternative solutions
It has been proposed that existing markup serves to satisfy the use cases that <main> has been proposed for. Let’s analyse these on some of the most popular Web sites. First let’s list the propsed algorithms.
Proposed solution No 1: Scooby-Doo
On Sat, Nov 17, 2012 at 11:01 AM, Ian Hickson <ian@hixie.ch> wrote:
| The main content is whatever content isn't
| marked up as not being main content (anything not marked up with <header>,
| <aside>, <nav>, etc).
This implies that the first element that is not a <header>, <aside>, <nav>, or <footer> will be the element that we want to give to a blind user as the location where they should start reading. The algorithm is implemented in https://gist.github.com/4032962.
Proposed solution No 2: First article element
On Sat, Nov 17, 2012 at 8:01 AM, Ian Hickson  wrote:
| On Thu, 15 Nov 2012, Ian Yang wrote:
| >
| > That's a good idea. We really need an element to wrap all the <p>s,
| > <ul>s, <ol>s, <figure>s, <table>s ... etc of a blog post.
|
| That's called <article>.
This approach identifies the first <article> element on the page as containing the main content. Here’s the algorithm for this approach.
Proposed solution No 3: An example heuristic approach
The readability plugin has been developed to make Web pages readable by essentially removing all the non-main content from a page. An early source of readability is available. This demonstrates what a heuristic approach can perform.
Analysing alternative solutions
Comparison
I’ve picked 4 typical Websites (top on Alexa) to analyse how these three different approaches fare. Ideally, I’d like to simply apply the above three scripts and compare pictures. However, since the semantic HTML5 elements <header>, <aside>, <nav>, and <footer> are not actually used by any of these Web sites, I don’t actually have this choice.
So, instead, I decided to make some assumptions of where these semantic elements would be used and what the outcome of applying the first two algorithms would be. I can then compare it to the third, which is a product so we can take screenshots.
The search results page would likely be built with:
a <nav> menu for the Google bar
a <header> for the search bar
another <header> for the login section
another <nav> menu for the search types
a <div> to contain the rest of the page
a <div> for the app bar with the search number
a few <aside>s for the left and right column
a set of <article>s for the search results
“Scooby Doo” would find the first element after the headers as the “main content”. This is the element before the app bar in this case. Interestingly, there is a <div @id=main> already in the current Google results page, which “Scooby Doo” would likely also pick. However, there are a nav bar and two asides in this div, which clearly should not be part of the “main content”. Google actually placed a @role=main on a different element, namely the one that encapsulates all the search results.
“First Article” would find the first search result as the “main content”. While not quite the same as what Google intended – namely all search results – it is close enough to be useful.
The “readability” result is interesting, since it is not able to identify the main text on the page. It is actually aware of this problem and brings a warning before displaying this page:
a <header> to contain the center column “megaphone”
a <div> for the status posting
a set of <article>s for the home stream
“Scooby Doo” would find the first element after the headers as the “main content”. This is the element that contains all three columns. It’s actually a <div @id=content> already in the current Facebook user page, which “Scooby Doo” would likely also pick. However, Facebook selected a different element to place the @role=main : the center column.
“First Article” would find the first news item in the home stream. This is clearly not what Facebook intended, since they placed the @role=main on the center column, above the first blog post’s title. “First Article” would miss that title and the status posting.
The “readability” result again disappoints but warns that it failed:
an <aside> for the right column with an <article> per related video
an <aside> for the information below the video
a <article> per comment below the video
“Scooby Doo” would find the first element after the headers as the “main content”. This is the element that contains the rest of the page. It’s actually a <div @id=content> already in the current YouTube video page, which “Scooby Doo” would likely also pick. However, YouTube’s related videos and comments are unlikely to be what the user would regard as “main content” – it’s the video they are after, which generously has a <div id=watch-player>.
“First Article” would find the first related video or comment in the home stream. This is clearly not what YouTube intends.
The “readability” result is not quite as unusable, but still very bare:
a <header> bar for the search, login and menu items
a <div> to contain the rest of the page
an &ls; article> with title and lots of text
<article> an <aside> with the table of contents
several <aside>s for the left column
Good news: “Scooby Doo” would find the first element after the headers as the “main content”. This is the element that contains the rest of the page. It’s actually a <div id=”content” role=”main”> element on Wikipedia, which “Scooby Doo” would likely also pick.
“First Article” would find the title and text of the main element on the page, but it would also include an <aside>.
The “readability” result is also in agreement.
Results
In the following table we have summarised the results for the experiments:
Site
Scooby-Doo
First article
Readability
Google.com
FAIL
SUCCESS
FAIL
Facebook.com
FAIL
FAIL
FAIL
YouTube.com
FAIL
FAIL
FAIL
Wikipedia.com
SUCCESS
SUCCESS
SUCCESS
Clearly, Wikipedia is the prime example of a site where even the simple approaches find it easy to determine the main content on the page. WordPress blogs are similarly successful. Almost any other site, including news sites, social networks and search engine sites are petty hopeless with the proposed approaches, because there are too many elements that are used for layout or other purposes (notifications, hidden areas) such that the pre-determined list of semantic elements that are available simply don’t suffice to mark up a Web page/application completely.
Conclusion
It seems that in general it is impossible to determine which element(s) on a Web page should be the “main” piece of content that accessibility tools jump to when requested, that a search engine should put their focus on, or that should be highlighted to a general user to read. It would be very useful if the author of the Web page would provide a hint through a <main> element where that main content is to be found.
I think that the <main> element becomes particularly useful when combined with a default keyboard shortcut in browsers as proposed by Steve: we may actually find that non-accessibility users will also start making use of this shortcut, e.g. to get to videos on YouTube pages directly without having to tab over search boxes and other interactive elements, etc. Worthwhile markup indeed.
TTML has been specified by the W3C Timed Text Working Group and released as a RECommendation v1.0 in November 2010. Since then, several organisations have tried to adopt it as their caption file format. This includes the SMPTE, the EBU (European Broadcasting Union), and Microsoft.
Both, Microsoft and the EBU actually looked at TTML in detail and decided that in order to make it usable for their use cases, a restriction of its functionalities is needed.
EBU-TT
The EBU released EBU-TT, which restricts the set of valid attributes and feature. “The EBU-TT format is intended to constrain the features provided by TTML, especially to make EBU-TT more suitable for the use with broadcast video and web video applications.” (see EBU-TT).
In addition, EBU-specific namespaces were introduce to extend TTML with EBU-specific data types, e.g. ebuttdt:frameRateMultiplierType or ebuttdt:smpteTimingType. Similarly, a bunch of metadata elements were introduced, e.g. ebuttm:documentMetadata, ebuttm:documentEbuttVersion, or ebuttm:documentIdentifier.
The use of namespaces as an extensibility mechanism will ascertain that EBU-TT files continue to be valid TTML files. However, any vanilla TTML parser will not know what to do with these custom extensions and will drop them on the floor.
Simple Delivery Profile
With the intention to make TTML ready for “internet delivery of Captions originated in the United States”, Microsoft proposed a “Simple Delivery Profile for Closed Captions (US)” (see Simple Profile). The Simple Profile is also a restriction of TTML.
Unfortunately, the Microsoft profile is not the same as the EBU-TT profile: for example, it contains the “set” element, which is not conformant in EBU-TT. Similarly, the supported style features are different, e.g. Simple Profile supports “display-region”, while EBU-TT does not. On the other hand, EBU-TT supports monospace, sans-serif and serif fonts, while the Simple profile does not.
Thus files created for the Simple Delivery Profile will not work on players that expect EBU-TT and the reverse.
Fortunately, the Simple Delivery Profile does not introduce any new namespaces and new features, so at least it is an explicit subpart of TTML and not both a restriction and extension like EBU-TT.
SMPTE-TT
SMPTE also created a version of the TTML standard called SMPTE-TT. SMPTE did not decide on a subset of TTML for their purposes – it was simply adopted as a complete set. “This Standard provides a framework for timed text to be supported for content delivered via broadband means,…” (see SMPTE-TT).
However, SMPTE extended TTML in SMPTE-TT with an ability to store a binary blob with captions in another format. This allows using SMPTE-TT as a transport format for any caption format and is deemed to help with “backwards compatibility”.
Now, instead of specifying a profile, SMPTE decided to define how to convert CEA-608 captions to SMPTE-TT. Even if it’s not called a “profile”, that’s actually what it is. It even has its own namespace: “m608:”.
Conclusion
With all these different versions of TTML, I ask myself what a video player that claims support for TTML will do to get something working. The only chance it has is to implement all the extensions defined in all the different profiles. I pity the player that has to deal with a SMPTE-TT file that has a binary blob in it and is expected to be able to decode this.
Now, what is a caption author supposed to do when creating TTML? They obviously cannot expect all players to be able to play back all TTML versions. Should they create different files depending on what platform they are targeting, i.e. a EBU-TT version, a SMPTE-TT version, a vanilla TTML version, and a Simple Delivery Profile version? Should they by throwing all the features of all the versions into one TTML file and hope that the players will pick out the right things that they require and drop the rest on the floor?
Maybe the best way to progress would be to make a list of the “safe” features: those features that every TTML profile supports. That may be the best way to get an “interoperable TTML” file. Here’s me hoping that this minimal set of features doesn’t just end up being the usual (starttime, endtime, text) triple.
UPDATE:
I just found out that UltraViolet have their own profile of SMPTE-TT called CFF-TT (see UltraViolet FAQ and spec). They are making some SMPTE-TT fields optional, but introduce a new @forcedDisplayMode attribute under their own namespace “cff:”.
In my probably somewhat subjective view, recommendation level means that a snapshot is taken of the continuously evolving HTML spec, which has a comprehensive feature set, that is implemented in a cross-browser interoperable way, has a complete test set for the features, and has received wide review. The latter implies that other groups in the W3C have had a chance to look at the specification and make sure it satisfies their basic requirements, which include e.g. applicability to all users (accessibility, internationalization), platforms, and devices (mobile, TV).
Basically it means that we stop for a “moment”, take a deep breath, polish the feature set that we’ve been working on this far, and make sure we all agree on it, before we get back to changing the world with cool new stuff. In a software project we would call it a release branch with feature freeze.
Now, as productive as that may sound for software – it’s not actually that exciting for a specification. Firstly, the most exciting things happen when writing new features. Secondly, development of browsers doesn’t just magically stop to get the release (REC) happening. And lastly, if we’ve done our specification work well, there should be only little work to do. Basically, it’s the unthankful work of tidying up that we’re looking at here. 🙂
So, why am I doing it? I am not doing this for money – I’m currently part-time contracting to Google’s accessibility team working on video accessibility and this editor work is not covered by my contract. It wasn’t possible to reconcile polishing work on a specification with the goals of my contract, which include pushing new accessibility features forward. Therefore, when invited, I decided to offer my spare time to the W3C.
I’m giving this time under the condition that I’d only be looking at accessibility and video related sections. This is where my interest and expertise lie, and where I’m passionate to get things right. I want to make sure that we create accessibility features that will be implemented and that we polish existing video features. I want to make sure we don’t digress from implementations which continue to get updated and may follow the WHATWG spec or HTML.next or other needs.
I am not yet completely sure what the editorship will entail. Will we look at tests, too? Will we get involved in HTML.next? This far we’ve been preparing for our work by setting up adequate version control repositories, building a spec creation process, discussing how to bridge to the WHATWG commits, and analysing the long list of bugs to see how to cope with them. There’s plenty of actual text editing work ahead and the team is shaping up well! I look forward to the new experiences.
A bit over a week ago I gave a presentation at Web Directions Code 2012 in Melbourne. Maxine and John asked me to speak about something related to HTML5 video, so I went for the new shiny: WebRTC – real-time communication in the browser.
I only had 20 min, so I had to make it tight. I wanted to show off video conferencing without special plugins in Google Chrome in just a few lines of code, as is the promise of WebRTC. To a large extent, I achieved this. But I made some interesting discoveries along the way. Demos are in the slide deck.
UPDATE: Opera 12 has been released with WebRTC support.
Housekeeping: if you want to replicate what I have done, you need to install a Google Chrome Web Browser 19+. Then make sure you go to chrome://flags and activate the MediaStream and PeerConnection experiment(s). Restart your browser and now you can experiment with this feature. Big warning up-front: it’s not production-ready, since there are still changes happening to the spec and there is no compatible implementation by another browser yet.
Here is a brief summary of the steps involved to set up video conferencing in your browser:
Set up a video element each for the local and the remote video stream.
Grab the local camera and stream it to the first video element.
(*) Establish a connection to another person running the same Web page.
Send the local camera stream on that peer connection.
Accept the remote camera stream into the second video element.
Now, the most difficult part of all of this – believe it or not – is the signalling part that is required to build the peer connection (marked with (*)). Initially I wanted to run completely without a server and just enter the remote’s IP address to establish the connection. This is, however, not a functionality that the PeerConnection object provides [might this be something to add to the spec?].
So, you need a server known to both parties that can provide for the handshake to set up the connection. All the examples that I have seen, such as https://apprtc.appspot.com/, use a channel management server on Google’s appengine. I wanted it all working with HTML5 technology, so I decided to use a Web Socket server instead.
I implemented my Web Socket server using node.js (code of websocket server). The video conferencing demo is in the slide deck in an iframe – you can also use the stand-alone html page. Works like a treat.
While it is still using Google’s STUN server to get through NAT, the messaging for setting up the connection is running completely through the Web Socket server. The messages that get exchanged are plain SDP message packets with a session ID. There are OFFER, ANSWER, and OK packets exchanged for each streaming direction. You can see some of it in the below image:
I’m not running a public WebSocket server, so you won’t be able to see this part of the presentation working. But the local loopback video should work.
At the conference, it all went without a hitch (while the wireless played along). I believe you have to host the WebSocket server on the same machine as the Web page, otherwise it won’t work for security reasons.
A whole new world of opportunities lies out there when we get the ability to set up video conferencing on every Web page – scary and exciting at the same time!
With the latest developments in HTML5 and the still fairly new ARIA (Accessible Rich Interface Applications) attributes introduced by the W3C WAI (Web Accessibility Initiative), browsers have now implemented many features that allow you to make your JavaScript-heavy Web applications accessible.
Since I began working on making a complex web application accessible just over a year ago, I discovered that there was no step-by-step guide to approaching the changes necessary for creating an accessible Web application. Therefore, many people believe that it is still hard, if not impossible, to make Web applications accessible. In fact, it can be approached systematically, as this article will describe.
This post is based on a talk that Alice Boxhall and I gave at the recent Linux.conf.au titled “Developing accessible Web apps – how hard can it be?” (slides, video), which in turn was based on a Google Developer Day talk by Rachel Shearer (slides).
These talks, and this article, introduce a process that you can follow to make your Web applications accessible: each step will take you closer to having an application that can be accessed using a keyboard alone, and by users of screenreaders and other accessibility technology (AT).
The recommendations here only roughly conform to the requirements of WCAG (Web Content Accessibility Guidelines), which is the basis of legal accessibility requirements in many jurisdictions. The steps in this article may or may not be sufficient to meet a legal requirement. It is focused on the practical outcome of ensuring users with disabilities can use your Web application.
Step-by-step Approach
The steps to follow to make your Web apps accessible are as follows:
Use native HTML tags wherever possible
Make interactive elements keyboard accessible
Provide extra markup for AT (accessibility technology)
If you are a total newcomer to accessibility, I highly recommend installing a screenreader and just trying to read/navigate some Web pages. On Windows you can install the free NVDA screenreader, on Mac you can activate the pre-installed VoiceOver screenreader, on Linux you can use Orca, and if you just want a browser plugin for Chrome try installing ChromeVox.
1. Use native HTML tags
As you implement your Web application with interactive controls, try to use as many native HTML tags as possible.
HTML5 provides a rich set of elements which can be used to both add functionality and provide semantic context to your page. HTML4 already included many useful interactive controls, like <a>, <button>, <input> and <select>, and semantic landmark elements like <h1>. HTML5 adds richer <input> controls, and a more sophisticated set of semantic markup elements like such as <time>, <progress>, <meter>, <nav>, <header>, <article> and <aside>. (Note: check browser support for browser support of the new tags).
Using as much of the rich HTML5 markup as possible means that you get all of the accessibility features which have been implemented in the browser for those elements, such as keyboard support, short-cut keys and accessibility metadata, for free. For generic tags you have to implement them completely from scratch.
What exactly do you miss out on when you use a generic tag such as <div> over a specific semantic one such as <button>?
Generic tags are not focusable. That means you cannot reach them through using the [tab] on the keyboard.
You cannot activate them with the space bar or enter key or perform any other keyboard interaction that would be regarded as typical with such a control.
Since the role that the control represents is not specified in code but is only exposed through your custom visual styling, screenreaders cannot express to their users what type of control it is, e.g. button or link.
Neither can screenreaders add the control to the list of controls on the page that are of a certain type, e.g. to navigate to all headers of a certain level on the page.
And finally you need to manually style the element in order for it to look distinctive compared to other elements on the page; using a default control will allow the browser to provide the default style for the platform, which you can still override using CSS if you want.
Example:
Compare these two buttons. The first one is implemented using a <div> tag, the second one using a <button> tag. Try using a screenreader to experience the difference.
Many sophisticated web applications have some interactive controls that just have no appropriate HTML tag equivalent. In this case, you will have had to build an interactive element with JavaScript and <div> and/or <span> tags and lots of custom styling. The good news is, it’s possible to make even these custom controls accessible, and as a side benefit you will also make your application smoother to use for power users.
The first thing you can do to test usability of your control, or your Web app, is to unplug the mouse and try to use only the [TAB] and [ENTER] keys to interact with your application.
Try the following:
Can you reach all interactive elements with [TAB]?
Can you activate interactive elements with [ENTER] (or [SPACE])?
Are the elements in the right tab order?
After interaction: is the right element in focus?
Is there a keyboard shortcut that activates the element (accesskey)?
No? Let’s fix it.
2.1. Reaching interactive elements
If you have an element on your page that cannot be reached with [TAB], put a @tabindex attribute on it.
Example:
Here we have a <span> tag that works as a link (don’t do this – it’s just a simple example). The first one cannot be reached using [TAB] but the second one has a tabindex and is thus part of the tab order of the HTML page.
(Note: since we experiment lots with the tabindex in this article, to avoid confusion, click on some text in this paragraph and then hit the [TAB] key to see where it goes next. The click will set your keyboard focus in the DOM.)
You set @tabindex=0 to add an element into the native tab order of the page, which is the DOM order.
2.2. Activating interactive elements
Next, you typically want to be able to use the [ENTER] and [SPACE] keys to activate your custom control. To do so, you will need to implement an onkeydown event handler. Note that the keyCode for [ENTER] is 13 and for [SPACE] is 32.
Example:
Let’s add this functionality to the <span> tag from before. Try tabbing to it and hit the [ENTER] or [SPACE] key.
function handlekey(event) {
var target = event.target || event.srcElement;
if (event.keyCode == 13 || event.keyCode == 32) { target.onclick(); }
}
Click
<span class="customlink" onclick="alert('activated!')" tabindex="0"
      onkeydown="handlekey(event);">
Click
</span>
<script>
function handlekey(event) {
  var target = event.target || event.srcElement;
  if (event.keyCode == 13 || event.keyCode == 32) {
    target.onclick();
  }
}
</script>
Note that there are some controls that might need support for keys other than [tab] or [enter] to be able to use them from the keyboard alone, for example a custom list box, menu or slider should respond to arrow keys.
2.3. Elements in the right tab order
Have you tried tabbing to all the elements on your page that you care about? If so, check if the order of tab stops seems right. The default order is given by the order in which interactive elements appear in the DOM. For example, if your page’s code has a right column that is coded before the main article, then the links in the right column will receive tab focus first before the links in the main article.
You could change this by re-ordering your DOM, but oftentimes this is not possible. So, instead give the elements that should be the first ones to receive tab focus a positive @tabindex. The tab access will start at the smallest non-zero @tabindex value. If multiple elements share the same @tabindex value, these controls receive tab focus in DOM order. After that, interactive elements and those with @tabindex=0 will receive tab focus in DOM order.
Example:
The one thing that always annoys me the most is if the tab order in forms that I am supposed to fill in is illogical. Here is an example where the first and last name are separated by the address because they are in a table. We could fix it by moving to a <div> based layout, but let’s use @tabindex to demonstrate the change.
Be very careful with using non-zero tabindex values. Since they change the tab order on the page, you may get side effects that you might not have intended, such as having to give other elements on the page a non-zero tabindex value to avoid skipping too many other elements as I would need to do here.
2.4. Focus on the right element
Some of the controls that you create may be rather complex and open elements on the page that were previously hidden. This is particularly the case for drop-downs, pop-ups, and menus in general. Oftentimes the hidden element is not defined in the DOM right after the interactive control, such that a [TAB] will not put your keyboard focus on the next element that you are interacting with.
The solution is to manage your keyboard focus from JavaScript using the .focus() method.
Example:
Here is a menu that is declared ahead of the menu button. If you tab onto the button and hit enter, the menu is revealed. But your tab focus is still on the menu button, so your next [TAB] will take you somewhere else. We fix it by setting the focus on the first menu item after opening the menu.
You will notice that there are still some things you can improve on here. For example, after you close the menu again with one of the menu items, the focus does not move back onto the menu button.
Also, after opening the menu, you may prefer not to move the focus onto the first menu item but rather just onto the menu <div>. You can do so by giving that div a @tabindex and then calling .focus() on it. If you do not want to make the div part of the normal tabbing order, just give it a @tabindex=-1 value. This will allow your div to receive focus from script, but be exempt from accidental tabbing onto (though usually you just want to use @tabindex=0).
Bonus: If you want to help keyboard users even more, you can also put outlines on the element that is currently in focus using CSS”s outline property. If you want to avoid the outlines for mouse users, you can dynamically add a class that removes the outline in mouseover events but leaves it for :focus.
2.5. Provide sensible keyboard shortcuts
At this stage your application is actually keyboard accessible. Congratulations!
However, it’s still not very efficient: like power-users, screenreader users love keyboard shortcuts: can you imagine if you were forced to tab through an entire page, or navigate back to a menu tree at the top of the page, to reach each control you were interested in? And, obviously, anything which makes navigating the app via the keyboard more efficient for screenreader users will benefit all power users as well, like the ubiquitous keyboard shortcuts for cut, copy and paste.
HTML4 introduced so-called accesskeys for this. In HTML5 @accesskey is now allowed on all elements.
The @accesskey attribute takes the value of a keyboard key (e.g. @accesskey="x") and is activated through platform- and browser-specific activation keys. For example, on the Mac it’s generally the [Ctrl] key, in IE it’ the [Alt] key, in Firefox on Windows [Shift]-[Alt], and in Opera on Windows [Shift]-[ESC]. You press the activation key and the accesskey together which either activates or focuses the element with the @accesskey attribute.
Example:
var button = document.getElementById(‘accessbutton’);
if (button.accessKeyLabel) {
button.innerHTML += ‘ (‘ + button.accessKeyLabel + ‘)’;
}
Now, the idea behind this is clever, but the execution is pretty poor. Firstly, the different activation keys between different platforms and browsers make it really hard for people to get used to the accesskeys. Secondly, the key combinations can conflict with browser and screenreader shortcut keys, the first of which will render browser shortcuts unusable and the second will effectively remove the accesskeys.
In the end it is up to the Web application developer whether to use the accesskey attribute or whether to implement explicit shortcut keys for the application through key event handlers on the window object. In either case, make sure to provide a help list for your shortcut keys.
Also note that a page with a really good hierarchical heading layout and use of ARIA landmarks can help to eliminate the need for accesskeys to jump around the page, since there are typically default navigations available in screen readers to jump directly to headings, hyperlinks, and ARIA landmarks.
3. Provide markup for AT
Having made the application keyboard accessible also has advantages for screenreaders, since they can now reach the controls individually and activate them. So, next we will use a screenreader and close our eyes to find out where we only provide visual cues to understand the necessary interaction.
Here are some of the issues to consider:
Role may need to get identified
States may need to be kept track of
Properties may need to be made explicit
Labels may need to be provided for elements
This is where the W3C’s ARIA (Accessible Rich Internet Applications) standard comes in. ARIA attributes provide semantic information to screen readers and other AT that is otherwise conveyed only visually.
Note that using ARIA does not automatically implement the standard widget behavior – you’ll still need to add focus management, keyboard navigation, and change aria attribute values in script.
3.1. ARIA roles
After implementing a custom interactive widget, you need to add a @role attribute to indicate what type of controls it is, e.g. that it is playing the role of a standard tag such as a button.
Example:
This menu button is implemented as a <div>, but with a role of “button” it is announced as a button by a screenreader.
Menu
<div tabindex="0" role="button">Menu</div>
ARIA roles also describe composite controls that do not have a native HTML equivalent.
Example:
This menu with menu items is implemented as a set of <div> tags, but with a role of “menu” and “menuitem” items.
Some interactive controls represent different states, e.g. a checkbox can be checked or unchecked, or a menu can be expanded or collapsed.
Example:
The following menu has states on the menu items, which are here not just used to give an aural indication through the screenreader, but also a visual one through CSS.
Some of the functionality of interactive controls cannot be captured by the role attribute alone. We have ARIA properties to add features that the screenreader needs to announce, such as aria-label, aria-haspopup, aria-activedescendant, or aria-live.
Example:
The following drop-down menu uses aria-haspopup to tell the screenreader that there is a popup hidden behind the menu button together with an ARIA state of aria-expanded to track whether it’s open or closed.
var button = document.getElementById(“button”);
var menu = document.getElementById(“menu”);
var items = document.getElementsByClassName(“menuitem”);
var focused = 0;
function showMenu(evt) {
evt.stopPropagation();
menu.style.visibility = ‘visible’;
button.setAttribute(‘aria-expanded’,’true’);
focused = getSelected();
items[focused].focus();
}
function hideMenu(evt) {
evt.stopPropagation();
menu.style.visibility = ‘hidden’;
button.setAttribute(‘aria-expanded’,’false’);
button.focus();
}
function getSelected() {
for (var i=0; i < items.length; i++) {
if (items[i].getAttribute('aria-checked') == 'true') {
return i;
}
}
}
function setSelected(elem) {
var curSelected = getSelected();
items[curSelected].setAttribute('aria-checked', 'false');
elem.setAttribute('aria-checked', 'true');
}
function selectItem(evt) {
setSelected(evt.target);
hideMenu(evt);
}
function getPrevItem(index) {
var prev = index – 1;
if (prev < 0) {
prev = items.length – 1;
}
return prev;
}
function getNextItem(index) {
var next = index + 1;
if (next == items.length) {
next = 0;
}
return next;
}
function handleButtonKeys(evt) {
evt.stopPropagation();
var key = evt.keyCode;
switch(key) {
case (13): /* ENTER */
case (32): /* SPACE */
showMenu(evt);
default:
}
}
function handleMenuKeys(evt) {
evt.stopPropagation();
var key = evt.keyCode;
switch(key) {
case (38): /* UP */
focused = getPrevItem(focused);
items[focused].focus();
break;
case (40): /* DOWN */
focused = getNextItem(focused);
items[focused].focus();
break;
case (13): /* ENTER */
case (32): /* SPACE */
setSelected(evt.target);
hideMenu(evt);
break;
case (27): /* ESC */
hideMenu(evt);
break;
default:
}
}
button.addEventListener('click', showMenu, false);
button.addEventListener('keydown', handleButtonKeys, false);
for (var i = 0; i < items.length; i++) {
items[i].addEventListener('click', selectItem, false);
items[i].addEventListener('keydown', handleMenuKeys, false);
}
<div class="custombutton" id="button" tabindex="0" role="button"
   aria-expanded="false" aria-haspopup="true">
    <span>Justify</span>
</div>
<div role="menu"  class="menu" id="menu" style="display: none;">
  <div tabindex="0" role="menuitem" class="menuitem" aria-checked="true">
    Left
  </div>
  <div tabindex="0" role="menuitem" class="menuitem" aria-checked="false">
    Center
  </div>
  <div tabindex="0" role="menuitem" class="menuitem" aria-checked="false">
    Right
  </div>
</div>
[CSS and JavaScript for example omitted]
3.4. Labelling
The main issue that people know about accessibility seems to be that they have to put alt text onto images. This is only one means to provide labels to screenreaders for page content. Labels are short informative pieces of text that provide a name to a control.
There are actually several ways of providing labels for controls:
on img elements use @alt
on input elements use the label element
use @aria-labelledby if there is another element that contains the label
use @title if you also want a label to be used as a tooltip
otherwise use @aria-label
I’ll provide examples for the first two use cases – the other use cases are simple to deduce.
Example:
The following two images show the rough concept for providing alt text for images: images that provide information should be transcribed, images that are just decorative should receive an empty @alt attribute.
When marking up decorative images with an empty @alt attribute, the image is actually completely removed from the accessibility tree and does not confuse the blind user. This is a desired effect, so do remember to mark up all your images with @alt attributes, even those that don’t contain anything of interest to AT.
Example:
In the example form above in Section 2.3, when tabbing directly on the input elements, the screen reader will only say “edit text” without announcing what meaning that text has. That’s not very useful. So let’s introduce a label element for the input elements. We’ll also add checkboxes with a label.
In this example we use several different approaches to show what a different it makes to use the <label> element to mark up input boxes.
The first two fields just have a <label> element next to a <input> element. When using a screenreader you will not notice a difference between this and not using the <label> element because there is no connection between the <label> and the <input> element.
In the third field we use the @for attribute to create that link. Now the input field isn’t just announced as “edit text”, but rather as “Lastname edit text”, which is much more useful. Also, the screenreader can now skip the labels and get straight on the input element.
In the fourth and fifth field we actually encapsulate the <input> element inside the <label> element, thus avoiding the need for a @for attribute, though it doesn’t hurt to explicity add it.
Finally we look at the checkbox. By including a referenced <label> element with the checkbox, we change the screenreaders announcement from just “checkbox not checked” to “Remember me checkbox not checked”. Also notice that the click target now includes the label, making the checkbox not only more usable to screenreaders, but also for mouse users.
4. Conclusions
This article introduced a process that you can follow to make your Web applications accessible. As you do that, you will noticed that there are other things that you may need to do in order to give the best experience to a power user on a keyboard, a blind user using a screenreader, or a vision-impaired user using a screen magnifier. But once you’ve made a start, you will notice that it’s not all black magic and a lot can be achieved with just a little markup.
I spoke about the video and audio element in HTML5, how to provide fallback content, how to encode content, how to control them from JavaScript, and briefly about Drupal video modules, though the next presentation provided much more insight into those. I explained how to make the HTML5 media elements accessible, including accessible controls, captions, audio descriptions, and the new WebVTT file format. I ran out of time to introduce the last section of my slides which are on WebRTC.
Linux.conf.au
On the first day of LCA I gave a talk both in the Multimedia Miniconf and the Browser Miniconf.
Browser Miniconf
In the Browser Miniconf I talked about “Web Standardisation – how browser vendors collaborate, or not” (slides). Maybe the most interesting part about this was that I tried out a new slide “deck” tool called impress.js. I’m not yet sure if I like it but it worked well for this talk, in which I explained how the HTML5 spec is authored and who has input.
I also sat on a panel of browser developers in the Browser Miniconf (more as a standards than as a browser developer, but that’s close enough). We were asked about all kinds of latest developments in HTML5, CSS3, and media standards in the browser.
Multimedia Miniconf
In the Multimedia Miniconf I gave a “HTML5 media accessibility update” (slides). I talked about the accessibility problems of Flash, how native HTML5 video players will be better, about accessible video controls, captions, navigation chapters, audio descriptions, and WebVTT. I also provided a demo of how to synchronize multiple video elements using a polyfill for the multitrack API.
Finally, and most importantly, Alice Boxhall and myself gave a talk in the main linux.conf.au titled “Developing Accessible Web Apps – how hard can it be?” (video, slides). I spoke about a process that you can follow to make your Web applications accessible. I’m writing a separate blog post to explain this in more detail. In her part, Alice dug below the surface of browsers to explain how the accessibility markup that Web developers provide is transformed into data structures that are handed to accessibility technologies.
The Open Video Conference that took place on 10-12 September was so overwhelming, I’ve still not been able to catch my breath! It was a dense three days for me, even though I only focused on the technology sessions of the conference and utterly missed out on all the policy and content discussions.
Roughly 60 people participated in the Open Media Software (OMS) developers track. This was an amazing group of people capable and willing to shape the future of video technology on the Web:
HTML5 video developers from Apple, Google, Opera, and Mozilla (though we missed the NZ folks),
codec developers from WebM, Xiph, and MPEG,
Web video developers from YouTube, JWPlayer, Kaltura, VideoJS, PopcornJS, etc.,
content publishers from Wikipedia, Internet Archive, YouTube, Netflix, etc.,
open source tool developers from FFmpeg, gstreamer, flumotion, VideoLAN, PiTiVi, etc,
and many more.
To provide a summary of all the discussions would be impossible, so I just want to share the key take-aways that I had from the main sessions.
Tim Terriberry (Mozilla), Serge Lachapelle (Google) and Ethan Hugg (CISCO) moderated this session together (slides). There are activities both at the W3C and at IETF – the ones at IETF are supposed to focus on protocols, while the W3C ones on HTML5 extensions.
The current proposal of a PeerConnection API has been implemented in WebKit/Chrome as open source. It is expected that Firefox will have an add-on by Q1 next year. It enables video conferencing, including media capture, media encoding, signal processing (echo cancellation etc), secure transmission, and a data stream exchange.
Current discussions are around the signalling protocol and whether SIP needs to be required by the standard. Further, the codec question is under discussion with a question whether to mandate VP8 and Opus, since transcoding gateways are not desirable. Another question is how to measure the quality of the connection and how to report errors so as to allow adaptation.
What always amazes me around RTC is the sheer number of specialised protocols that seem to be required to implement this. WebRTC does not disappoint: in fact, the question was asked whether there could be a lighter alternative than to re-use dozens of years of protocol development – is it over-engineered? Can desktop players connect to a WebRTC session?
We are already in a second or third revision of this part of the HTML5 specification and yet it seems the requirements are still being collected. I’m quietly confident that everything is done to make the lives of the Web developer easier, but it sure looks like a huge task.
Zohar Babin (Kaltura) and myself moderated this session and I must admit that this session was the biggest eye-opener for me amongst all the sessions. There was a large number of Flash developers present in the room and that was great, because sometimes we just don’t listen enough to lessons learnt in the past.
This session gave me one of those aha-moments: it the form of the Flash appendBytes() API function.
The appendBytes() function allows a Flash developer to take a byteArray out of a connected video resource and do something with it – such as feed it to a video for display. When I heard that Web developers want that functionality for JavaScript and the video element, too, I instinctively rejected the idea wondering why on earth would a Web developer want to touch encoded video bytes – why not leave that to the browser.
But as it turns out, this is actually a really powerful enabler of functionality. For example, you can use it to:
display mid-roll video ads as part of the same video element,
sequence playlists of videos into the same video element,
implement DVR functionality (high-speed seeking),
do mash-ups,
do video editing,
adaptive streaming.
This totally blew my mind and I am now completely supportive of having such a function in HTML5. Together with media fragment URIs you could even leave all the header download management for resources to the Web browser and just request time ranges from a video through an appendBytes() function. This would be easier on the Web developer than having to deal with byte ranges and making sure that appropriate decoding pipelines are set up.
Philip Jagenstedt (Opera) and myself moderated this session. We focused on the HTML5 track element and the WebVTT file format. Many issues were identified that will still require work.
One particular topic was to find a standard means of rendering the UI for caption, subtitle, und description selection. For example, what icons should be used to indicate that subtitles or captions are available. While this is not part of the HTML5 specification, it’s still important to get this right across browsers since otherwise users will get confused with diverging interfaces.
Chaptering was discussed and a particular need to allow URLs to directly point at chapters was expressed. I suggested the use of named Media Fragment URLs.
The use of WebVTT for descriptions for the blind was also discussed. A suggestion was made to use the voice tag <v> to allow for “styling” (i.e. selection) of the screen reader voice.
Finally, multitrack audio or video resources were also discussed and the @mediagroup attribute was explained. A question about how to identify the language used in different alternative dubs was asked. This is an issue because @srclang is not on audio or video, only on text, so it’s a missing feature for the multitrack API.
Beyond this session, there was also a breakout session on WebVTT and the track element. As a consequence, a number of bugs were registered in the W3C bug tracker.
This session was moderated by John Luther and John Koleszar, both of the WebM Project. They started off with a presentation on current work on WebM, which includes quality testing and improvements, and encoder speed improvement. Then they moved on to questions about how to involve the community more.
The community criticised that communication of what is happening around WebM is very scarce. More sharing of information was requested, including a move to using open Google+ hangouts instead of Google internal video conferences. More use of the public bug tracker can also help include the community better.
Another pain point of the community was that code is introduced and removed without much feedback. It was requested to introduce a peer review process. Also it was requested that example code snippets are published when new features are announced so others can replicate the claims.
This all indicates to me that the WebM project is increasingly more open, but that there is still a lot to learn.
This session was moderated by Frank Galligan and Aaron Colwell (Google), and Mark Watson (Netflix).
Mark started off by giving us an introduction to MPEG DASH, the MPEG file format for HTTP adaptive streaming. MPEG has just finalized the format and he was able to show us some examples. DASH is XML-based and thus rather verbose. It is covering all eventualities of what parameters could be switched during transmissions, which makes it very broad. These include trick modes e.g. for fast forwarding, 3D, multi-view and multitrack content.
MPEG have defined profiles – one for live streaming which requires chunking of the files on the server, and one for on-demand which requires keyframe alignment of the files. There are clear specifications for how to do these with MPEG. Such profiles would need to be created for WebM and Ogg Theora, too, to make DASH universally applicable.
Further, the Web case needs a more restrictive adaptation approach, since the video element’s API is already accounting for some of the features that DASH provides for desktop applications. So, a Web-specific profile of DASH would be required.
Then Aaron introduced us to the MediaSource API and in particular the webkitSourceAppend() extension that he has been experimenting with. It is essentially an implementation of the appendBytes() function of Flash, which the Web developers had been asking for just a few sessions earlier. This was likely the biggest announcement of OVC, alas a quiet and technically-focused one.
Aaron explained that he had been trying to find a way to implement HTTP adaptive streaming into WebKit in a way in which it could be standardised. While doing so, he also came across other requirements around such chunked video handling, in particular around dynamic ad insertion, live streaming, DVR functionality (fast forward), constraint video editing, and mashups. While trying to sort out all these requirements, it became clear that it would be very difficult to implement strategies for stream switching, buffering and delivery of video chunks into the browser when so many different and likely contradictory requirements exist. Also, once an approach is implemented and specified for the browser, it becomes very difficult to innovate on it.
Instead, the easiest way to solve it right now and learn about what would be necessary to implement into the browser would be to actually allow Web developers to queue up a chunk of encoded video into a video element for decoding and display. Thus, the webkitSourceAppend() function was born (specification).
The proposed extension to the HTMLMediaElement is as follows:
partial interface HTMLMediaElement {
  // URL passed to src attribute to enable the media source logic.
  readonly attribute [URL] DOMString webkitMediaSourceURL;

  bool webkitSourceAppend(in Uint8Array data);

  // end of stream status codes.
  const unsigned short EOS_NO_ERROR = 0;
  const unsigned short EOS_NETWORK_ERR = 1;
  const unsigned short EOS_DECODE_ERR = 2;

  void webkitSourceEndOfStream(in unsigned short status);

  // states
  const unsigned short SOURCE_CLOSED = 0;
  const unsigned short SOURCE_OPEN = 1;
  const unsigned short SOURCE_ENDED = 2;

  readonly attribute unsigned short webkitSourceState;
};
The code is already checked into WebKit, but commented out behind a command-line compiler flag.
Frank then stepped forward to show how webkitSourceAppend() can be used to implement HTTP adaptive streaming. His example uses WebM – there are no examples with MPEG or Ogg yet.
The chunks that Frank’s demo used were 150 video frames long (6.25s) and 5s long audio. Stream switching only switched video, since audio data is much lower bandwidth and more important to retain at high quality. Switching was done on multiplexed files.
Every chunk requires an XHR range request – this could be optimised if the connections were kept open per adaptation. Seeking works, too, but since decoding requires download of a whole chunk, seeking latency is determined by the time it takes to download and decode that chunk.
Similar to DASH, when using this approach for live streaming, the server has to produce one file per chunk, since byte range requests are not possible on a continuously growing file.
Frank did not use DASH as the manifest format for his HTTP adaptive streaming demo, but instead used a hacked-up custom XML format. It would be possible to use JSON or any other format, too.
After this session, I was actually completely blown away by the possibilities that such a simple API extension allows. If I wasn’t sold on the idea of a appendBytes() function in the earlier session, this one completely changed my mind. While I still believe we need to standardise a HTTP adaptive streaming file format that all browsers will support for all codecs, and I still believe that a native implementation for support of such a file format is necessary, I also believe that this approach of webkitSourceAppend() is what HTML needs – and maybe it needs it faster than native HTTP adaptive streaming support.
This session was moderated by Zachary Ozer and Pablo Schklowsky (JWPlayer). Their motivation for the topic was, in fact, also HTTP adaptive streaming. Once you leave the decisions about when to do stream switching to JavaScript (through a function such a wekitSourceAppend()), you have to expose stream metrics to the JS developer so they can make informed decisions. The other use cases is, of course, monitoring of the quality of video delivery for reporting to the provider, who may then decide to change their delivery environment.
The discussion found that we really care about metrics on three different levels:
measuring the network performance (bandwidth)
measuring the decoding pipeline performance
measuring the display quality
In the end, it seemed that work previously done by Steve Lacey on a proposal for video metrics was generally acceptable, except for the playbackJitter metric, which may be too aggregate to mean much.
I didn’t actually attend this session held by Anant Narayanan (Mozilla), but from what I heard, the discussion focused on how to manage permission of access to video camera, microphone and screen, e.g. when multiple applications (tabs) want access or when the same site wants access in a different session. This may apply to real-time communication with screen sharing, but also to photo sharing, video upload, or canvas access to devices e.g. for time lapse photography.
This was another session that I wasn’t able to attend, but I believe the creation of good open source video editing software and similar video creation software is really crucial to giving video a broader user appeal.
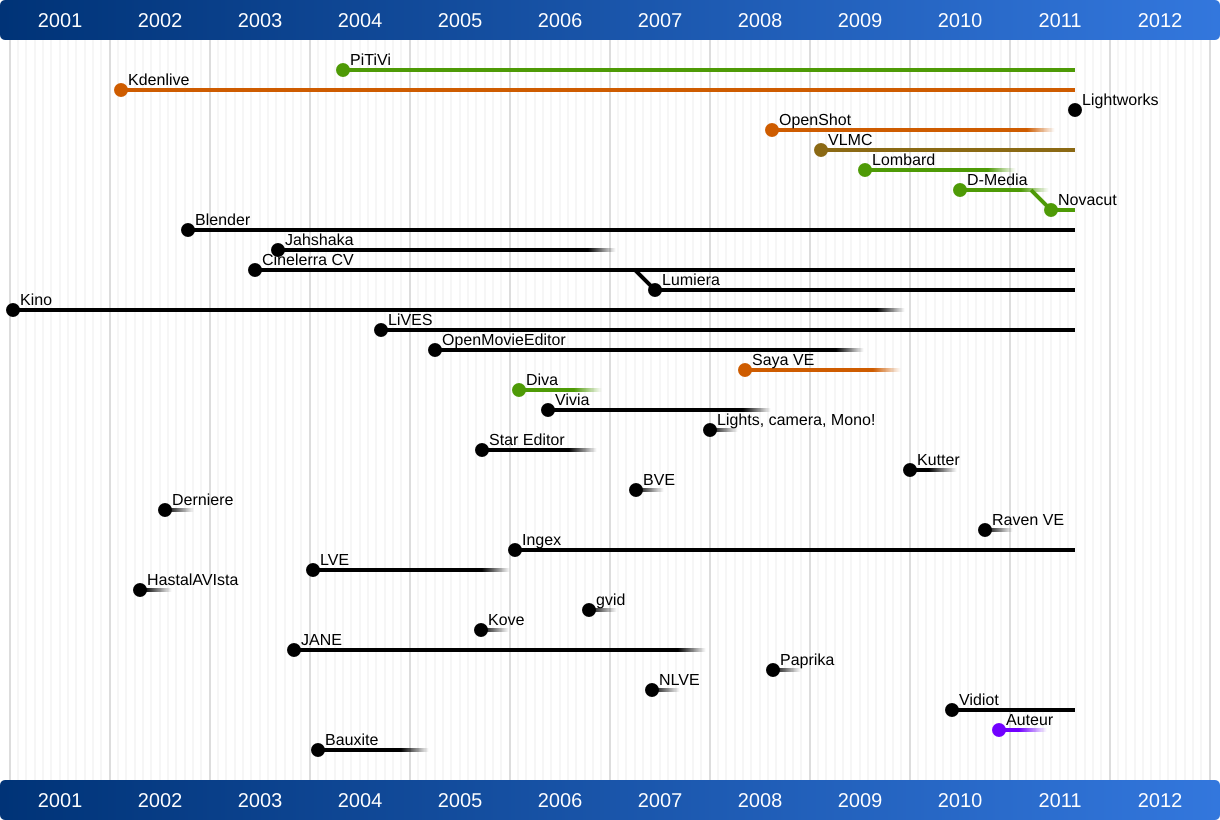
Jeff Fortin (PiTiVi) moderated this session and I was fascinated to later see his analysis of the lifecycle of open source video editors. It is shocking to see how many people/projects have tried to create an open source video editor and how many have stopped their project. It is likely that the creation of a video editor is such a complex challenge that it requires a larger and more committed open source project – single people will just run out of steam too quickly. This may be comparable to the creation of a Web browser (see the size of the Mozilla project) or a text processing system (see the size of the OpenOffice project).
Jeff also mentioned the need to create open video editor standards around playlist file formats etc. Possibly the Open Video Alliance could help. In any case, something has to be done in this space – maybe this would be a good topic to focus next year’s OVC on?
Monday’s Breakout Groups
The conference ended officially on Sunday night, but we had a third day of discussions / hackday at the wonderful New York Lawschool venue. We had collected issues of interest during the two previous days and organised the breakout groups on the morning (Schedule).
In the Content Protection/DRM session, Mark Watson from Netflix explained how their API works and that they believe that all we need in browsers is a secure way to exchange keys and an indicator of protection scheme is used – the actual protection scheme would not be implemented by the browser, but be provided by the underlying system (media framework/operating system). I think that until somebody actually implements something in a browser fork and shows how this can be done, we won’t have much progress. In my understanding, we may also need to disable part of the video API for encrypted content, because otherwise you can always e.g. grab frames from the video element into canvas and save them from there.
In the Playlists and Gapless Playback session, there was massive brainstorming about what new cool things can be done with the video element in browsers if playback between snippets can be made seamless. Further discussions were about a standard playlist file formats (such as XSPF, MRSS or M3U), media fragment URIs in playlists for mashups, and the need to expose track metadata for HTML5 media elements.
What more can I say? It was an amazing three days and the complexity of problems that we’re dealing with is a tribute to how far HTML5 and open video has already come and exciting news for the kind of applications that will be possible (both professional and community) once we’ve solved the problems of today. It will be exciting to see what progress we will have made by next year’s conference.
Thanks go to Google for sponsoring my trip to OVC.


